Tools Needed
We will leverage below tools to test the Snapdocs closing experiences, including creating closing and receiving notifications from Snapdocs Connect.
Postman
Please download and install the Postman desktop application from https://www.postman.com/downloads/
Import Collections
There are multiple Postman collections available for you to test. This is because our clients usually focus on specific user experiences for example
- Lender or LOS systems
- Borrower or POS systems
- Settlement Agents or TPS systems
Typically closings are created at Snapdocs by LOS system, therefore you will always need the LOS collection to create closings.
We suggest to download all the collections to your local computer and important them into your Postman by selecting “Import” then choose “Folder”.
Use Postman
Inside each collection, we group requests by functionalities. Every collection has a "Get Access Token" request since you must get the access token first before executing any other requests.
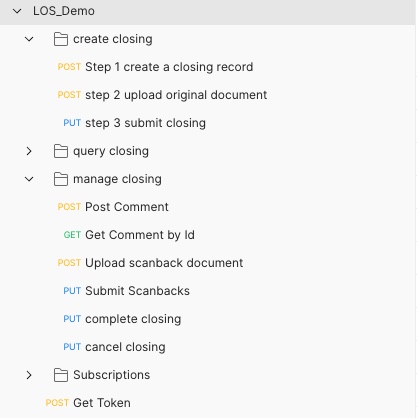
Inside LOS collection, you will find requests to
- Get Access Token
- Create A Closing
- Operate on Closing

LOS Postman Collection
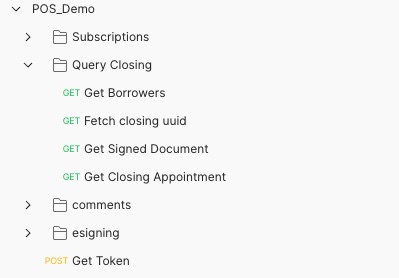
POS collection has much less requests compared with LOS since POS typically leverage the broadcasted events through webhooks.

POS Postman Collection
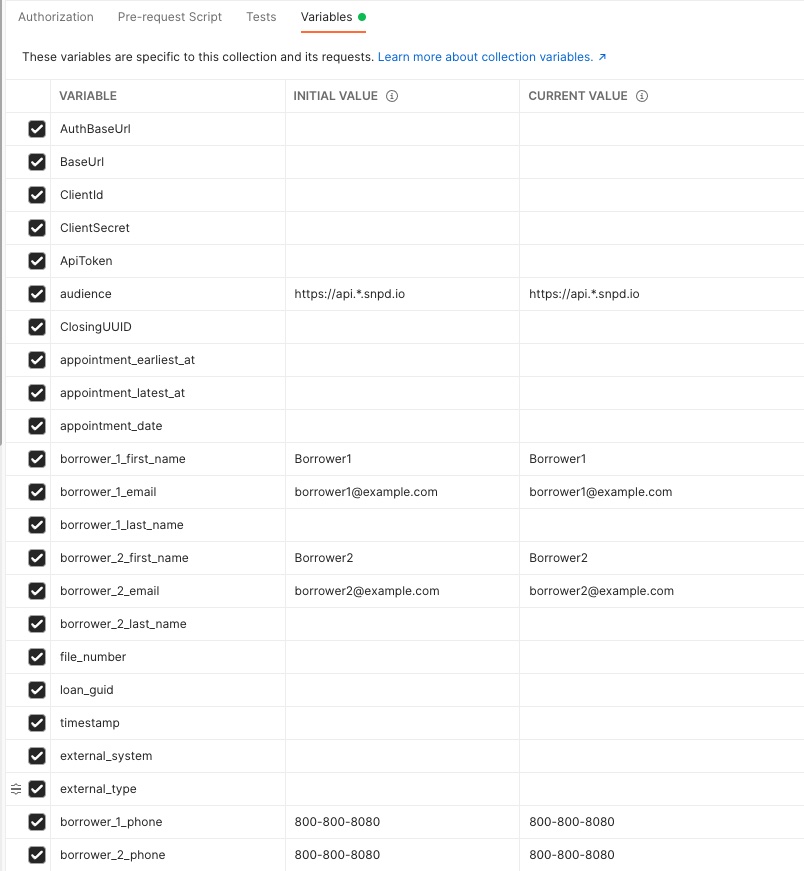
In our collection, we are leveraging the variables, specifically the “collection variables” (https://learning.postman.com/docs/sending-requests/variables/) to store and reuse values between HTTP requests.
Select the Postman collection, and the "variables" tab, you will find the variables used by the collection. Some of them are set once and used across the requests, for example the “BaseUrl”. Others are set from JS script after getting response from Snapdocs API. To set the value, you can edit the "Current Value" of any variable.

Postman Collection Variables
Use the “Get Token” request as example, it will use those “configuration” variables like “AuthBaseUrl”, “ClientId”, “ClientSecret”, and “audience” which are set at collection.
Click the “Tests” tab, you will see the simple JS code to read the “access_token” from the API response, and set the value of collection variable “ApiToken”. This variable is used in the following requests for the “authorization” header.
We can also run JS script before sending HTTP requests, and set variable values. For example, select the request “Step 1 Create Closing Record”, click the “Pre-request Script” tab. Here we are generating some variables with testing values. Those variables are used in the request body of the request.
JSON-Server
With Postman, we can test the Snapdocs Connect API by sending HTTP requests. However, we will also need to receive notifications or events from Snapdocs as discussed in Subscriptions and Webhooks
For the purpose of testing, you can install server at your local computer. In this example, we will use https://github.com/typicode/json-server which is a free Rest API server.
Step 1: download the JSON-Server
You may need to install node.js if you don’t have it already at your local. Follow the instructions at https://nodejs.org/en/download/ to install node.js and npm
npm –version
npm install -g json-server
Step 2: create a local file for example “db.json” to store the incoming messages, with below content
{
  "events": []
}
Step 3: Start the server in the same folder where you have the db.json
json-server --id event_id --watch db.json --port 3456This will give you a Restful API service at http://localhost:3456/events
Ngrok
Now you have a local server that can be used to receive incoming requests, however, it must be exposed to Snapdocs. And we will use Ngrok
Step 1, download and install Ngrok from https://ngrok.com/download
Step 2: start ngrok
ngrok http 3456ngrok will print a external URL for example https://f9a1-34-124-93-13.ngrok.io, which is the public URL for the local JSON-server, then the webhook URL to receive Snapdocs events with will be
Updated 9 months ago
